Engine Odds and Ends
These are engine-related odds and ends (posts from the GSR forum) that I wanted to keep for future reference.
Back to BikeCliff's website.
On This Page:
The Suzuki oil sight glass is not on many parts fiches, only about $9.
LENS, OIL LEVEL CHECK
Suzuki Part# 11971-45010 for all 4-cyl GS bikes.
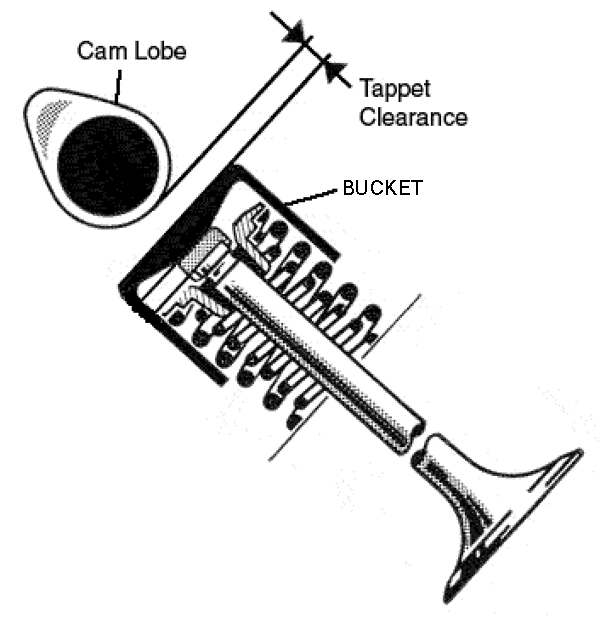
Valve Shim Worksheet: 
Click the thumbnail below to download a worksheet to help you keep
notes on current and final shim sizes and clearance values, mileage,
etc. You may want to Right-Click and "Save As...".

Valve Adjustment Video:
A Youtube user named BaltimoreGS has put together a very informative video chronicling the process of
valve adjustment on his GS500. The procedure will be the same for
all GS twins. The principle is the same for all 2-valve GS motors.
CLICK HERE to go to the Youtube video.

CLICK HERE to see what happens when valve clearances are not adjusted.
Shaft Drive Gear Ratio Chart - courtesy of Mr. Nessism

Cam Chain Tensioner Repair
Q. If
I had the chain tensioner off my '80 GS1100E and I turned the bike over
briefly without thinking....how bad is that? The chain guide where the
tensioner pushes has 'moved' so that I cannot get the tensioner back
on. Help!
Depends on several things. If the chain jumped sprockets on the cams
they are out of time and may have possibly bent valves. At this point
you need to pull the valve cover and confirm the cams are still timed
at TDC. Then if all is well you need to reinstall the tensioner the way
the factory intended.
Loosen the lock nut on the left
side of the tensioner and back the slotted bolt out 1/4 turn. Turn the
knob on the right side of the tensioner, which in the Suzuki service
manual is called a lock shaft handle, counterclock-wise. As you are
turning the knob counterclock-wise push the pushrod all the way back.
Keep turning the knob until it refuses to turn any further.
With the pushrod still pushed in as far as it will go tighten the slotted bolt so that the pushrod will not plunge out.
Remount the tensioner to the
cylinder block. If the tensioner is not going in turn the crankshaft
clockwise slowly to get slack in the cam chain on the intake side of
the block.
Loosen the slotted bolt 1/4
turn allowing the pushrod to advance towards the cam chain. Tighten the
lock nut but leave the slotted bolt loose by that 1/4 turn.
While turning the knob
counterclock-wise, slowly rotate the crankshaft in reverse direction,
counterclock-wise. This causes the chain to push the pushrod back.
Release the knob and slowly
turn the crankshaft in the normal direction, clockwise. You should see
the knob rotate as the chain becomes progressively tighter. If it does
the pushrod is obviously moving forward under spring pressure
signifying the tensioner is in good operable condition. If it moves
sluggishly or not at all that means the pushrod or the slotted bolt is
sticking. If so remove the tensioner from the block again and inspect
the pushrod. It could need cleaning or could be bent or galled. Further
crank rotation will take the slack out of the cam chain.
Reset Cam Chain Tensioner
Originaly posted by Mr. TheCafeKid
If you dont have another
gasket, pull it off carefully, try not to damage the gasket. If you
don't have another, and you mess the gasket up, make one out of some
light cardboard (it will work just fine.) and reset it. While you have
it off, inspect and clean it up. When you reset it, loosen the nut,
loosen the set screw. Turn the knob out, while pushing in on the
tensioner rod untill its all the way in. Lock down the set screw, and
lightly tighten the nut. Install the tensioner, and after you have it
torqued down, loosen the nut, and the set screw. The tensioner should
then pop into place. You should see the knob turn back in a bit. Might
help to rotate the engine by hand a time or two. Then, tighten the set
screw, back it off a 1/2 turn, and while holding it in that spot,
tighten the nut. The set screw should NOT be in all the way tight.
Mr. Billy Ricks adds:
With the tensioner removed from
the cylinder block loosen the lock nut on the left side of the
tensioner and back the slotted bolt out 1/4 turn. Turn the knob on the
right side of the tensioner, which in the Suzuki service manual is
called a lock shaft handle, counterclock-wise. As you are turning the
knob counterclock-wise push the pushrod all the way back. Keep turning
the knob until it refuses to turn any further.
With the pushrod still pushed in as far as it will go tighten the slotted bolt so that the pushrod will not plunge out.
Remount the tensioner to the
cylinder block. If the tensioner is not going in turn the crankshaft
clockwise slowly to get slack in the cam chain on the intake side of
the block.
Loosen the slotted bolt 1/4
turn allowing the pushrod to advance towards the cam chain. Tighten the
lock nut but leave the slotted bolt loose by that 1/4 turn.
Here's how to service the tensioner:
While turning the knob
counterclock-wise, slowly rotate the crankshaft in reverse direction,
counterclock-wise. This causes the chain to push the pushrod back.
Release the knob and slowly
turn the crankshaft in the normal direction, clockwise. You should see
the knob rotate as the chain becomes progressively tighter. If it does
the pushrod is obviously moving forward under spring pressure
signifying the tensioner is in good operable condition. If it moves
sluggishly or not at all that means the pushrod or the slotted bolt is
sticking. If so remove the tensioner from the block again and inspect
the pushrod. It could need cleaning or could be bent or galled. Further
crank rotation will take the slack out of the cam chain.
Also see Mr. bwringer's cam chain tensioner service article here: http://bwringer.com/gs/camchaintens.html
Shifter Seal Replacement
Remove the shift lever.
Simply hook and pull the seal
out of the engine and off of the shaft. Place the hook between the
shift shaft and the inner sealing surface of the oil seal-- pull
straight out. (Some have suggested screwing in a small wood screw
to give you something to hold on to as you try to pull it out over the
shift shaft.)
Clean up the shaft and seal recess.
Put a small plastic bag over the shift shaft.
Grease the outer surface of the bag and the new seal.
Slide the seal over the covered
shaft and tap into place. The outer surface of the seal should be flush
with the engine surface, flat and level.
You tap only the outer edge of the new seal, carefully, not to distort and ruin it.
The plastic bag covers the splines so as not to tear the inner rubber of the new seal while installing.
Glue is rarely used but may be necessary if the fit is really loose between engine case and outer edge of the seal.
Gearbox
Sprocket Oil Seal Replacement: GS550 - by Mr Suzuki_Don and Mr. bmt
Generic Bolt Sizes From Suzuki Part Numbers (Thanks to Mr. bwringer)
The lengths of the screws are embedded in the Suzuki part number, so you can usually figure them out from a fiche.
Here's an online fiche with real part numbers:
http://flatoutmotorcycles.com/fiche_select.asp
As an example, on the clutch cover on a 1978 GS750,
it appears to use two 6mm thread X 55mm length screws and eight 6mm
thread X 20mm screws.
The 6X55mm screws:
Part #: 02112-06557
The 6X20mm screws:
Part #: 02112-06207
Note the first four digits in the second half of the part number.
In case you're wondering, you always leave the head
out when you measure fasteners. The diameter is the width of the
threads (NOT the size of the wrench or bolt head), and the length is
the shank measured from under the head to the tip.
Phillips head (cross head) screws are just sick and wrong -- a terrible joke. I hate them.
Standard 6mm hex head bolts have 10mm heads, and are too big to be used on GS cases.
Allen head stainless steel screws (with antiseize
applied) are the only way to go, unless you must have absolute
historical accuracy. Regular steel rusts instantly.
You can also buy stainless allen head screws in bulk from several places. My favorite is McMaster-Carr:
http://www.mcmaster.com
I've also ordered from MMS:
http://www.mmsacc-stainless.com/
A couple of updates to that:
Another great source for stainless bolts is: http://boltdepot.com
Suzuki uses standard metric thread pitches up through 8mm:
3mm x .5
4mm x .7
5mm X .8
6mm X 1
8mm X 1.25
When you get to 10mm fasteners, Suzuki usually uses fine pitch threads:
10mm X 1.25
12mm X 1.25
But when you get to fasteners this size, you
don't really want to replace them with stainless anyway -- best to
stick with the original fasteners. Stainless is strong, but brittle,
and it's not a good idea to use it in heavily loaded suspension, frame,
or brake components.
Suzuki brake banjo bolts are 10mm X 1.0mm threads.
Oil Cover Studs and Nuts (Thanks to Mr. bwringer)
I install stainless steel studs, and use stainless nuts with the nylon locking inserts.
My reasoning is that the stainless steel is much harder than the OEM cheddar cheese, so the threads wear much less.
The nylon insert nuts ensure that I never have to over-tighten the nuts
out of the fear that they might come loose. I snug them down hand tight
with a 10mm hand driver, and I know they aren't going anywhere.
http://www.mcmaster.com
And before I get 1,000,000 PMs, I used the 40mm studs:
93805A326 - Metric 18-8 SS Fully Threaded Stud M6 Size, 40mm Length, 1mm Pitch - In stock at $1.30 Each
The
bottom hole in the engine cases goes all the way through, so you have
to sort of "glue" it in there with Loctite. After it sets, the stud
won't come out when you change oil.
How To Read Your Spark Plugs
(Everything you ever wanted to know about reading your spark plugs, but were afraid to ask.)
http://www.ngksparkplugs.com/tech_support/spark_plugs/faqs/faqread.asp
http://www.dansmc.com/spark_plugs/spark_plugs_catalog.html
More technical/racing articles about plugs:
http://www.4strokes.com/tech/sparkplg.asp
http://www.4secondsflat.com/Spark_plug_reading.html
http://www.dragstuff.com/techarticles/how-to-read-plugs.html
Stay tuned for more.
Back to BikeCliff's website.