These
are bits of wisdom I have gleaned from posts on the GS
Resources
Forums.
The notes in [brackets] are mine. -BassCliff
Back to BikeCliff's website
On this page:
Bench
Sync Your CV Carbs
By
Mr. Steve (Woodin)
To
bench sync the carbs, you do need to have the rack assembled, but not
on the bike. Open the master idle speed adjuster until carb #3 has a
gap in the throttle plate that is large enough to put something in.
That 'something' needs to be small, like a paper clip. Adjust the
idle speed adjuster so there is just a light drag on the paper clip,
much like you do when checking the valves. You will see adjuster
mechanisms between the carbs, so loosen the locknut, adjust the screw
so you have the same amount of drag on carb #2, then carb #1. After
doing those two (in that order), do carb #4. Now adjust the master
idle screw out to close the throttles back down. I like to close them
completely, then back in about a turn or two. When you start the
bike, be ready to hit the kill switch if the idle speed is still set
too high and the engine races when it starts. Back the idle speed
screw out some more and start the engine again. When you have the
engine warmed up and are ready to do the vacuum sync, use the same
order of adjustment.
Notes
from other members:
From
Mr. KiwiGS
-
Assemble
carbs [in the rack like they are] ready to go on the bike.
-
Set
air screws 1 1/2 turns from bottom [from lightly seated].
-
Determine
master carb [#3]. The one that the throttle cable connects to right?
-
Put
a small drill bit 1.5mm under the butterfly of the master carb.
-
Adjust
the main idle screw until the butterfly just touches the drill bit.
-
Adjust
the sync
screws until all of the butterflys are the same.
-
Check
the master carb again.
-
Reset
the idle screw.
Additional
comments from:
Mr.
chef1366: I use a flexible feeler gauge [instead of a drill
bit]. #3 is the master carb.
Mr.
Steve: Start at 2 full turns out and use a smaller gauge. I have
had a couple sets of carbs that would not open to 1.5 mm, so I use a
straightened-out paper clip. The larger ones I have available at home
are 1.05 mm in diameter, the 'normal' size clips are 0.88 mm. Just be
sure that there are no burrs on the end of the clip that will scratch
the throat of the carb. Also, don't forget to re-set the idle
speed before starting the bike. With the throttle open far enough to
do the bench
sync,
revs will tend to skyrocket when started.
Ms.
SqDancerLynn1: The only thing I would add is to make sure the #3
throttle blade is completely closed with the idle screw backed out.
You never know what was done in the past.
Mr.
Steve (again): Ms. Lynn makes a good point. What I tend
to do when finished is to back off the idle screw until there is a
gap in the adjuster, then shine a light through all the carb throats
to verify that they all are closed. Then do a visual sync
as I turn the idle adjuster until it touches, then about one turn
more.

Morgon Colortune/Carbtune Tips - originally posted by Mr. LarryD with notes from Mr. bwringer.
For vacuum syncing your carbs on the bike, please see Mr. bwringer's excellent Syncronize Carburetors guide using the Morgan Carb Tune.
Think you might have worn jets and needles? Click below for pictures and information.
http://www.factorypro.com/tech/needle1.html
http://www.factorypro.com/products/Mikuni_needle_jet_buy.html
Overflowing Carbs by Mr. bwringer
Let
me point out the obvious: If a carb (or carbs) are overflowing when the
bike is not running, you have TWO problems. First, your petcock should
prevent ANY flow; second, the needle valve should allow flow only up to
a fixed height in the bowl (ie, not overflow). Excess fuel has to make
its way past both of these parts.
(A
third possibility on old carbs is for fuel to flow past the inlet seat
O-ring. [n/a for VM]. That doesn't apply to newly rebuilt carbs, since
the owner has just installed brand new. Right??)
I'm
not 100% sure why some needle valves leak and others don't, but I'm
starting to lean with Keith Kraus' suggestion, which is to use only OEM
valves and seats. Simply because it works. The question why is a
separate matter. (I have a theory, but no guinea pig to test it on at
present).
For
the petcock, you'll hear a number of suggestions. I think that the
vacuum operated petcock should be kept operational, for a few safety
reasons.
Several
of the folks here are convinced that petcock rebuild kits are useless,
and your only real option is to buy a new OEM petcock.
For
now, for people who are 100% sick of carb overflow & the ensuing
problems, the consensus then is to go with OEM petcock, seats &
needles. it's expensive, but it seems to be the only certain way to
correct this BS once and for all.
(I
would add: no doubt there are people whose overflow problems began when
they installed carb rebuild kit(s). The machining on the parts is often
abhorrent and inexcusably amateurish, and the f&^%#ing O-rings
don't fit correctly. The consensus for a while now has been to buy
gaskets IF you need them, valve seats & needles IF you need them,
and an O-ring kit.)
The
petcock does not, in any way, REGULATE the rate of flow. It should be
either on or off. If you have overflow on a running bike (and it's not
inhaling fuel through the petcock diaphragm via the petcock vacuum
line) then there's a problem with the inlet valve.
Either:
1) the float is no longer buoyant enough or is badly adjusted, or
2)the valve is bad, or is being held open by some foreign matter.
And finally is the standard BWRINGER's lecture:
One
of the secrets of the GS850 engine and carburetion is its outstanding
low-speed manners. This, in turn, allows you to much more easily
exploit the corners of its handling envelope, which leads to more giddy
fun than you've ever had with your clothes on. As most racers
eventually find out, smooth is fast.
If
you had a freer-flowing aftermarket exhaust, a good set of K&N
pods, a dynamometer, exhaust gas analyzers, a degree in chemical
engineering, no neighbors to bother, a few weeks off work, a large box
of Keihin jets, and several fifths of good tequila so you can sleep at
night, you might be able to extract a few more horsepower from the 850
engine at certain RPM. And if you're really good, you might be able to
get the low end half as smooth as it was stock. Maybe.
With
the stock exhaust, forget it -- all you're going to do is screw up
everything else quite badly to get maybe 5 more horsepower at 7,500 rpm
or something like that. These things have a certain balance, and more
intake flow must be balanced by more exhaust flow.
Additional Petcock Notes: (by Mr. tkent02)
There are two paths for fuel to get through the petcock into the crankcase or onto the floor:
One path is a holed diaphragm. Fuel flows down the vacuum line into the #2
carburetor (#3 for VM carbs), and into the intake port. The petcock will
still function normally as far as shutting off the flow of fuel when the
engine is off, and unless the hole is very big, it will still turn on
the flow of fuel when the engine is running. To test for this, check for
fuel in the vacuum line. You should be able to suck on the vacuum hose
and not get any fuel, none whatsoever, if the diaphragm is good. If you see or
taste fuel the diaphragm is leaking.
The second path is by the rubber O-ring in the vacuum valve being
damaged, or it's just too old and not sealing properly. In this case the fuel
cannot be shut off completely. It just leaks all the time. When it is
on the bike, with a full tank, and with fuel in the line to the carburetor,
there is a vertical drop of over a foot. This creates quite a syphon effect
trying to pull fuel though the leaky O-ring. If the petcock can't seal
perfectly, fuel will flow slowly the entire time the bike is shut off
until the tank is emptied into the crankcase. If you take the hose off
to look, you lose the vacuum of the syphon. It is possible that it won't
leak while you are watching it. A good test is to run a fuel line from
the petcock down a few feet to a suitable container, go to prime to fill
the hose, move it back to ON, mark the fuel level in the container, and
go away for a while. If you come back later, or tomorrow and there is
more fuel in the container than there was previously, you have a slow leak from the
petcock. It takes only a few drops a minute to put a gallon or so into
your oil over time. It's very hard to detect a slow leak just by looking at
it.
The
VM carbs on 1979 and earlier GS bikes have overflow tubes under the
float bowls which should just dump any overflowing fuel onto the ground
under the bike. These can clog up or be routed wrong. But if they work
properly it should prevent fuel from going into the crankcase. The CV
carbs on the 1980 and later GSes have no such overflow hoses, this fuel
is going into the engine, period.
If you want a decent, reliable motorcycle, just skip all the testing and
buy a new petcock. The old one did its job for thirty years. Get a new
one and forget about it for another thirty.
Removing Float Pins - by Mr. Nessism
Due to an interference fit between the float pivot pin and the support
post, the post can snap off when driving out the pin. The interference
fit is only on one side of the pin, next to the nail head detail. You
need to support the float post before driving out the pin. Hopefully
the photos are self explanatory.

Support the float pin with a small socket or similar.

Use a punch to carefully remove the float pin.

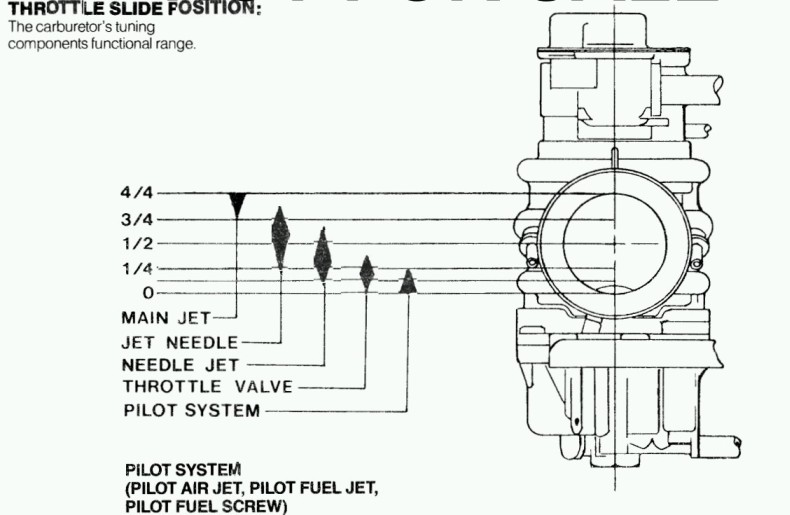
Mikuni Motorcycle Carb Theory 101
Motorcycle carburetors look very complex, but with a little theory, you
can tune your bike for maximum performance. Read this webpage for explanations that even I can understand.
http://www.iwt.com.au/mikunicarb.htm
Please visit us online at The GS Resources @ http://www.thegsresources.com.
Thank you for your indulgence,
BassCliff
Back to BikeCliff's website